04
Adding a CSV Entity

1. How to Create a CSV Entity
To be connected to multiple organisations from different accounting system, use the Snapzl CSV Entities. Connect your data by exporting a CSV file from your accounting system and importing into the Snapzl CSV Entity.
1. From Snapzl's welcome page, select the tenant you want to use.
2. Go to the "Settings" button.
3. On the left side of the page, find the menu items. Navigate to the "Integrations" section.
4. Click the "Connect" button next to CSV Entites.

5. The CSV entity creation dialog box will appear.

6. Enter a unique code for the CSV Entity. (Note: The code cannot be changed once saved).
7. Provide the name of your organisation.
8. Optionally, you can choose to import your chart of accounts at this stage or add it later.
Download the CSV template, to ensure that the file you have created adheres to the import file's specifications
9. Click the "Create" button to finalise the CSV Entity creation. The CSV Entities section will become visible once you've successfully added a CSV Entity.

10. You can now begin importing your chart of accounts and working with your CSV Entity.
2. How to Import CSV Chart of Accounts
1. Start from Snapzl's homepage.
2. Navigate to the "CSV Entities" section, found on the left side of the screen.
3. Double click the organisation that you want to add chart of accounts.
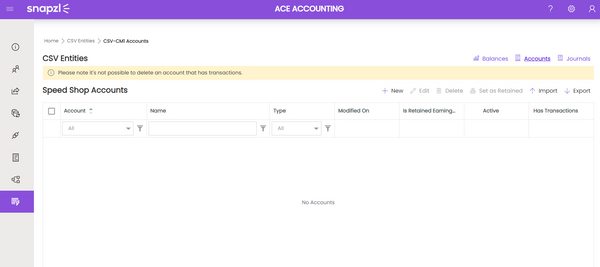
4. Click the Accounts button from the upper right side of the page. On the Accounts page, you'll find various options to manage your accounts effectively.

5. To import your Chart of Accounts, locate and click the "Import" button. This action will open the "Import Accounts" dialog box.

6. Within the "Import Accounts" dialog box, download the Snapzl Chart of Accounts template. Ensure that your Chart of Accounts adheres to the file's specifications, including accurate completion of mandatory fields and the use of correct account types.
7. Confirm your selection by clicking the "Import" button after selecting the CSV file that contains your prepared Chart of Accounts, ensuring it aligns with your intended financial structure.
8. The newly added accounts will promptly appear in the Accounts list, conveniently accessible within the context of your selected CSV Entity.

9. Additionally, you have the option to select retained earnings. Simply choose a chart account from your list and click the "Set the retained earnings" button.

3. How to Import CSV Account Balances
Important Notes
-
Each month's data in the CSV file should represent a summary of account movements for that particular period.
-
Ensure that the total of the account balances for each month equals zero.
-
In Snapzl, a debit balance is represented as a positive number, while a credit balance is indicated as a negative number.
-
You have the flexibility to import data for multiple months within a financial year.
-
You may have a file that contains 12 months of account balances or a file that represents account balances for just one month.
Preparing the CSV file
1. In the CSV Entities section, double-click the entity you want to work with.
2. Navigate to the "Journals" section and click on "Import Balances." The Import Journals dialog box appears.

3. Snapzl provides a CSV file template to facilitate the reporting process.
Click on the word "here" to download the template file.
4. After completing your import file, upload it within Snapzl. Hit the import button.

5. All the imported account balances will be displayed on your Journal list.

6. To see the details of the journal, double-click on it. This action will take you to the summary journal page.
